Data Import
Overview
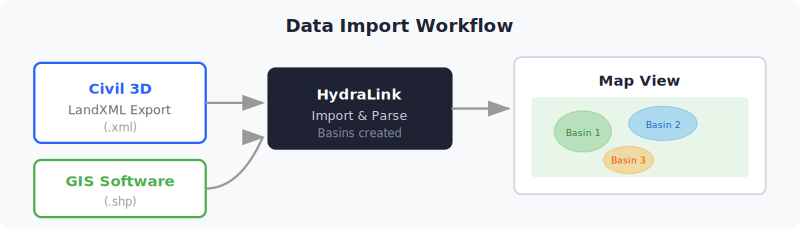
HydraLink supports importing drainage area data from external sources to accelerate project setup. Rather than manually defining every basin, you can import parcel or drainage area boundaries from Civil 3D or GIS files and have them automatically placed on the map view.
Civil 3D Parcels (LandXML)
Import basin areas directly from Autodesk Civil 3D parcel data exported as LandXML files. This is useful when drainage basins have already been delineated in Civil 3D as part of the site grading and layout process.
How to Import
- In Civil 3D, export the parcels as a LandXML file (
.xml). - In HydraLink, select File → Import → LandXML Parcels.
- Browse to the exported LandXML file and click Open.
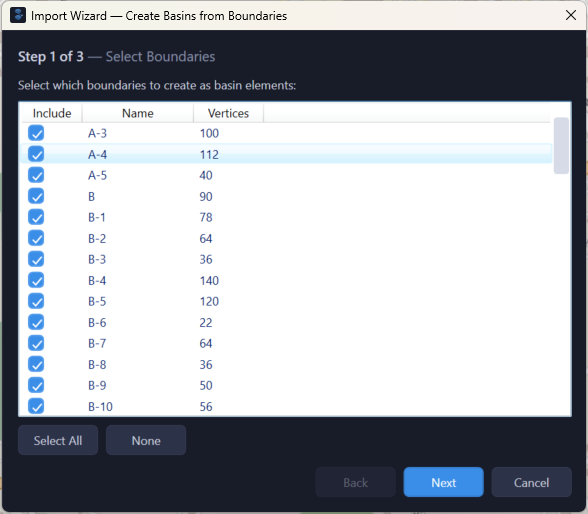
- HydraLink reads the parcel boundaries, areas, and names from the file.
- Basin elements are created on the map at the correct geographic locations.
What Gets Imported
| LandXML Property | HydraLink Property |
|---|---|
| Parcel name | Basin name |
| Parcel area | Basin area (acres) |
| Parcel boundary coordinates | Basin location on map |
After import, basins still need their hydrologic parameters configured (methodology, C or CN, Tc, etc.). The import provides the geometry and area; the engineer sets the runoff properties.
GIS Shapefiles
Import drainage area boundaries from ESRI shapefiles (.shp). This is useful
when drainage areas have been delineated in GIS software (ArcGIS, QGIS, etc.) or when
working with jurisdictional drainage area datasets.
How to Import
- Prepare a polygon shapefile containing drainage area boundaries.
- In HydraLink, select File → Import → GIS Shapefile.
- Browse to the
.shpfile and click Open. - HydraLink reads the polygon geometries and attribute table.
- Drainage areas are displayed on the interactive map view.
Supported Formats
| Format | Extension | Notes |
|---|---|---|
| ESRI Shapefile | .shp | Requires associated .dbf, .shx files |
| LandXML | .xml | Civil 3D parcel export |
Map View Integration
Imported basins and drainage areas are displayed on HydraLink’s interactive map canvas alongside other model elements. The map provides:
- OpenStreetMap basemap for spatial reference
- Pan and zoom navigation
- Visual overlay of imported drainage area boundaries
- Click-to-select for editing basin properties
- Drag-and-drop repositioning of elements
Considerations
- Ensure the source data uses a known coordinate system. HydraLink works with WGS 84 (EPSG:4326) for geographic coordinates and Web Mercator (EPSG:3857) for projected display.
- Imported basins provide geometry only — hydrologic parameters (methodology, C/CN, Tc, etc.) must be configured after import.
- For large projects, importing basins from Civil 3D or GIS can significantly reduce setup time compared to manual entry.
- Verify that imported areas match expected values after import, as coordinate transformations can sometimes introduce small rounding differences.