Symbols & Images
The symbol library is what turns CAD blocks into a rendered plan. Symbols can arrive automatically, by recognizing the block names already in the drawing, or be dragged in by hand from the library panel.
The Library Panel
At the bottom of the Layers and Objects tab, the Library expander lists assets by category. Drag a tile onto the canvas to place it; it lands on the selected layer and takes that layer's styling.
| Category | Contents |
|---|---|
| Trees | Deciduous and evergreen canopy trees in small, medium and large sizes, plus oak, maple, elm, pine, cedar, palm and crepe myrtle. |
| Landscaping | Shrubs, hedges, ground cover, flower beds, planters, boulders (round, angular and clustered). |
| Site | Site furniture: picnic tables, bike racks, trash receptacles. |
| Utilities | Manholes, catch basins, hydrants, gate valves, light poles. |
| Parking | Accessible parking symbol, accessible stall with striped access aisle, standard stall, wheel stop, bollard, EV charging, curb ramp with detectable warning surface, pavement arrows, accessible sign. |
| Furniture, People, Vehicles | Plan-view entourage for scale and context. |
| Symbols | North arrows and general plan symbols. |
| Style Presets | Not assets, but your saved style presets. |
Symbols and Looks
Trees and planting symbols are drawn in several families (realistic, sketch, marker, pencil, watercolor and flat) and the document look chooses which. A block placed as an oak stays an oak; only the artwork changes when you switch looks. The library tiles preview the current look's family, so what you drag in matches what is already on the sheet. Symbols with no variant in the current family fall back to another rather than vanishing.
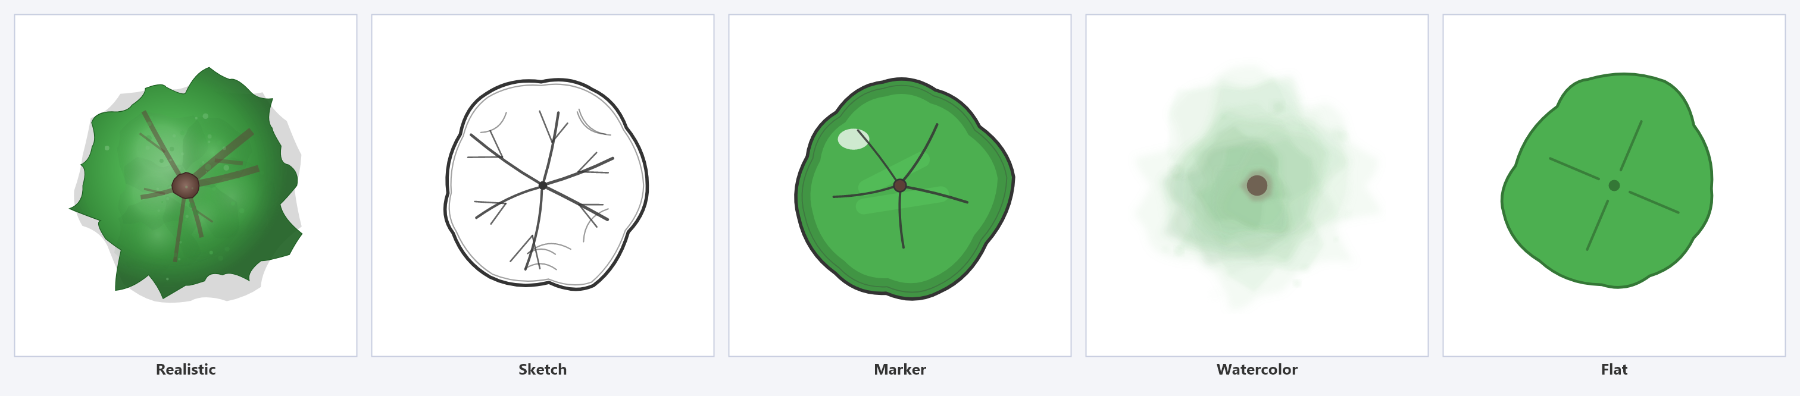
Coloring follows the same logic. Family variants and multi-color symbols keep their own palettes; monochrome line art, such as the utility symbols, takes the layer color so it can be tuned to the sheet.
Symbols from CAD Blocks
Blocks exported with the Keep as Symbol treatment are matched against the
library by name, so SSMH becomes a manhole, TREE-OAK-24 becomes an
oak, LP-SINGLE becomes a light pole. Insertion point, scale and rotation come
from the drawing.
A name that does not resolve is drawn as a placeholder marker. Fix that either by adding a rule in FILE ▸ CAD Mappings pointing the name at a library symbol, or by re-exporting that block with the Explode treatment so its own linework comes across. See CAD Auto-Mapping.
Plant Blocks and the Legend
FILE ▸ Plant Symbols matches the plant blocks of a planting plan to library symbols, whatever your office calls them. It finds the blocks the export exploded into linework, gathering each insert's pieces back together, and the blocks kept as symbols, and reads each one's name from the legend beside its copy on the sheet. It also opens by itself after an import when it has something to suggest.
Each row is one block: how it was drawn, its name, how many times the plan places it, its size, and the symbol to draw in its place. Studio suggests a symbol from the legend name, or from the size when the name says nothing; any row can be set to any tree or planting symbol, or kept as drawn. A block that a mapping rule already draws is listed too, set to the symbol it draws as today, so a wrong match can be put right here instead of hunted down.
Your choices carry to the next drawing. A symbol picked for a block kept as a symbol, or for a legend name whose suggestion you changed, is saved as a rule in CAD Mappings, and a new choice for a name replaces the symbol its old rule gave it. The rules can be reviewed, edited and shared with the office there.
Importing Your Own Assets
The + button beside the category list imports an SVG, PNG or JPEG into the library, where it behaves like any other asset. SVG is the better choice, because it stays sharp at any size and at any export resolution.
Raster Images
Insert Image, on both the FILE and DRAW tabs, places a raster
image: an aerial, a site photo, a logo, a scanned base. PNG, JPEG, BMP, GIF, TIFF and WebP
are accepted, up to 50 MB per file. Images are embedded in the .asp, so the
project stays self-contained when you hand it to someone.
The Image tab
| Control | Notes |
|---|---|
| Opacity | Fade an aerial back so linework reads over it. |
| Blend | How the image combines with what is under it. Multiply darkens only, so white in the image leaves the sheet untouched. |
| Width / Height | In page units, with Lock Aspect Ratio on by default. |
| Rotation (degrees) | Rotate to match the drawing. A terrain has no size or rotation controls. |
| Info | Pixel dimensions and embedded size. Check this before shipping a project with several large images. |
| Mask | Clips the picture to a shape and fades it out to the shape's edge. See below. |
| Replace Image | Swaps the file while keeping the placement, size and rotation. Useful when the aerial gets updated. |
Images can also be scaled and rotated with the on-canvas handles, and moved like any other object.
Fading an aerial with a mask
A land-use or concept plan often sits on an aerial that fades to the white sheet round the site, or fades out behind the data table. The Mask group on the Image tab does this. Pick a Shape: a Rectangle or Ellipse sits inside the picture by the Inset you give each edge, as a share of the picture's width or height; an Outline is a shape you click out on the canvas with the Mask Outline tool (right-click finishes, drawing again replaces it). Feather is the width of the fade in page units, measured in from the shape's edge: the picture is fully shown that far inside and gone at the edge, so a feather of 0 clips hard.
The mask is measured on the picture, so it rides along when the picture is moved, resized or turned, and it stays with the picture through Replace Image and an Update from AutoCAD. While the picture is selected the outline shows dashed; it never reaches an export. A PDF carries the masked picture as one image with a soft mask, so the fade stays smooth at any zoom and adds little to the file. A terrain has no mask.
The Terrain tab
A Civil 3D surface exported with Shade Civil 3D surface is a terrain: Studio keeps its triangles and draws the ground from them. Select it in the scene tree (it usually lies under the whole plan, so a click or a marquee on the canvas passes over it to what is drawn there) to show the Terrain tab: opacity and blend as for an image, then these controls. The info line gives the triangle count and the range of elevations drawn.
A terrain stays where the export placed it, lined up with the plan through the viewport's scale and twist, so it has no width, height or rotation. It cannot be dragged, aligned, copied or turned from the TRANSFORM tab: moved or turned, it would shade the wrong ground and cast its shadows the wrong way. An Update from CAD places it again, and a drawing whose terrain was rotated in an earlier version opens with it turned back.
| Control | Notes |
|---|---|
| Relief shading | Shades the ground by its slopes. |
| Relief on | All ground (exaggerated) shades every slope. Graded sites fall 1 to 5 percent, which no light shows at true scale, so the relief is exaggerated; it draws where the terrain sits in the draw order, which is under the paving and planting. Steep ground only shades just the walls, curbs, ramps and banks, at their true slope, and leaves flat and gently graded ground white; it draws over paving, planting and linework, so a retaining wall or a pond bank shows through the fill around it. It also hides the crumpled facets that sparse survey data makes on open ground. |
| Steeper than (%) | Steep ground only: the slope where the shading starts. The default 8 takes in ramps, curbs, walls and banks; 25 (4:1) keeps only banks and walls. |
| Light | Multidirectional (USGS) lights each slope from whichever of four directions, south-west round to north, shows it best, as USGS relief maps do, so ground facing any way reads. North-west is the classic single map light. Look's sun lights the ground from the look's sun, set by hand or by date and time in Look Settings, so the terrain agrees with the building and tree shadows. A sun from the bottom of the sheet can make hollows read as mounds, which is why multidirectional is the default. |
| Relief strength | The vertical exaggeration. On all ground the starting point comes from the surface itself, enough for its grading to show. On steep ground it starts at the true slope, 1.0x. The readout gives the result, for example 3.1x vertical. Drag right for more. |
| Round off triangle facets | Shades the surface as rounded ground rather than as flat triangles. Sparse survey and surfaces built from contours leave large triangles whose edges draw as hard creases, a crease at every contour line and a flat plate on top of each rise; with this on, the creases fade away. Curbs, walls, steps and small triangles stay sharp, and the ground on either side of a wall keeps its own slope right up to it. Only the shading changes: heights stay as the surface has them, so objects standing on it and the shadows are where they were. Turn it off to see the triangles exactly as Civil 3D made them. On by default. |
| Walls and banks cast shadows | In a look that casts shadows, the steps and banks in the surface throw shadows from the look's sun onto the lower ground, at their true height and in the look's shadow color: a 5 ft retaining wall throws about 7 ft of shadow at a 35 degree sun. A wall facing the sun throws none, so which walls show depends on the sun; a morning or afternoon sun placed by date in Look Settings shows the ones the hand-set sun lights. On by default. |
| Elevation tint | Off, Smooth or Bands. Colours the ground from low to high, so the plan shows where the site is high and where it drains to. Bands break on round elevations. |
| Palette | Terrain (teal low ground to tan high ground), Earth (green to brown) or Cool to warm (blue to orange). |
| Tint strength (%) | How strongly the color shows. |
| Band interval | The height of each band in drawing units. Leave it blank for a round interval suited to the surface; the automatic value shows beside the box. |
| Tint range, low to high | The elevations the palette runs between. Blank uses the surface's own range, trimmed so a stray survey point does not stretch it. Type the same range on two surfaces to color them alike. |
A terrain comes in at 70% opacity with Multiply, and the settings survive an Update from CAD. Replace Image turns a terrain into an ordinary picture.
In Ink Sketch, Marker, Colored Pencil and Watercolor the relief is not a grey picture: it is drawn in the look's medium, as up to three coats of pencil, marker, wash or hatching laid over the shaded ground, lighter to darker, in the look's shadow color (see Render Looks). The relief settings above decide where the coats go; the opacity sets how strong they are. An elevation tint still draws as a picture under them.
Steep relief and the surface's shadows lie on the ground: they draw over the paving, planting and linework and under the trees, shrubs, buildings and lettering. While either is on, the viewport draws its ground first and everything that stands up after it, whatever order the drawing gave them, so a hatch drawn over a tree in CAD no longer hides it.
Trees, buildings and walls given a height stand on the surface, and their shadows follow it: see Look Settings. Hiding the terrain's layer puts them back on flat ground.
Background Capture
A sheet exported with Capture paper space as background image carries the title block and border as a background layer. Toggle it with VIEW ▸ Background. It is the simplest way to keep the title block exactly as drafted while the drawing itself is rendered.
Placing planting that reads
- Let auto-mapping place the trees from the block names first. They land at the right coordinates and the right sizes.
- Fill in by hand from the library only where the CAD plan has no blocks.
- Keep tree canopies on their own layer so shadows and depth can be tuned without affecting the hardscape.
- Add people and vehicles sparingly; two or three give scale, a crowd competes with the plan.