Layers and Objects
The Layers and Objects tab is the scene tree: every layer in the document, the objects on it, and the asset library beneath. It is where you select what to style, set draw order, and control visibility.
Reading the Tree
Layers come from the CAD drawing's layer table, plus any layer you add in Studio. Expanding a layer lists the objects on it. Two nestings go deeper than that:
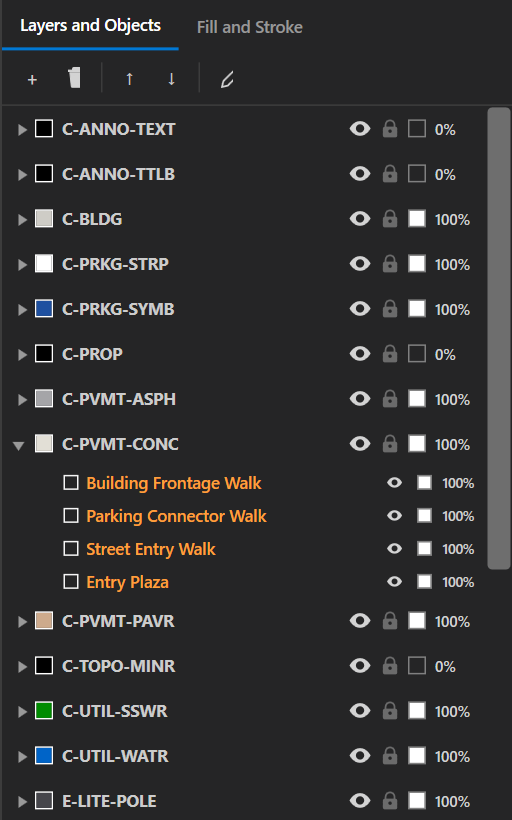
- Merged paths show their component paths as children. Styling applies to the parent; components can still be selected individually.
- Stroke layers, the extra strokes stacked on one path, appear as reorderable children with their own editing panel.
An object carrying a style override is marked in the tree, so you can see at a glance which objects have stopped following their layer.
Per-Layer Icons
| Icon | What it does |
|---|---|
| Eye | Shows or hides the layer. Hidden layers do not export. |
| Padlock | Locks the layer. Locked layers are dimmed and reject edits, moves and deletes, which is useful once a base layer is styled the way you want it. |
Individual objects have their own visibility toggle as well.
The Toolbar
| Button | What it does |
|---|---|
| + | Adds a new, empty layer for objects you draw in Studio. |
| Trash | Deletes the selection. Deleting a layer deletes the objects on it, and asks first. |
| ↑ / ↓ | Moves a selected object one step in draw order, or a selected layer one row in the tree. |
| Brush | Paint Style: copies a style onto other layers or objects. Esc exits. |
| List | Show Objects: lists each layer's objects under it. Turn it off to list layers only; see Working by Layer. |
Draw Order
The document arrives in AutoCAD's draw order, so hatches sit behind linework the way they do on the sheet. Every object carries its own place in that order, and that is what decides what draws on top; a layer's row in the tree does not. Change an object's place by dragging it onto another object in the tree, with the up and down buttons, or with Send to Front and Send to Back on its right-click menu.
To stack a whole layer, right-click it and choose Bring Layer to Front or
Send Layer to Back. Every object on the layer moves above, or beneath,
everything else in its viewport or on the sheet, keeping its order against the layer's other
objects, and one Ctrl+Z puts it back. An aerial that was sent to back when the
drawing was styled stays beneath areas painted later, for instance, and a layer of labels
brought to front clears the fills under it.
The tree's own order is yours to arrange. Drag a layer, press Ctrl+Up or
Ctrl+Down, or use Move to Top of Tree, Move Up in
Tree, Move Down in Tree and Move to Bottom of Tree
on its right-click menu, which is the quick way to send a layer the length of a long list.
While you drag, the tree scrolls when the pointer nears its top or bottom edge, and a drop
past the last row lands at the bottom. Layers arrive in alphabetical order.
Renaming a Layer
Double-click a layer's name, press F2 with the layer selected, or choose
Rename from its right-click menu, type the new name and press
Enter (Esc cancels). Every object on the layer follows it, along
with its material, isolation and remembered style. The name box at the top of the layer
properties does the same when you press Enter. A name that is empty or already
in use is refused. An xref layer keeps its xref| prefix; only the part after it
is renamed. The CAD drawing is untouched either way.
Paint Style
Paint Style is the fastest way to spread one finished style across a drawing:
- Select the layer or object whose style you want to copy.
- Click the brush button in the toolbar. It stays lit, and the status bar shows Paint Style, until you end it.
- Click each layer or object that should take that style.
- Press
Esc, or click Done next to Paint Style in the status bar, when finished.
Right-Click a Layer
| Item | What it does |
|---|---|
| Isolate Layer | Fades every other layer. With several layer rows picked it reads Isolate 3 Layers and isolates them all. See Isolating Layers. |
| Add to Isolated Layers | Brings a faded layer back to full strength without changing the rest. Shown while layers are isolated. |
| Unisolate Layers | Shows every layer at full strength again. Shown while layers are isolated. |
| Rename | Edits the layer's name in place (also F2 or a double-click). The CAD drawing is untouched. |
| Move to Top / Up / Down / Bottom of Tree | Moves the layer's row in the tree without dragging (Ctrl+Up and Ctrl+Down for the single steps). The drawing does not change. |
| Bring Layer to Front / Send Layer to Back | Puts every object on the layer above, or beneath, everything else in its viewport or on the sheet. One undo step. See Draw Order. |
| Material | Tags every object on the layer with a material such as turf, concrete or water. |
| Render as Plain CAD | Opts the layer out of the document look: clean lines, no look shadows or depth shading, its own lettering. See Render Looks. |
| Merge Touching Areas | Joins every group of areas on the layer that share an edge or overlap into one area, so a lawn a line once split shows no seam. Areas made in Studio only; each group keeps its largest area's style. Shown when the layer has two or more such areas. See Merging Areas. |
| Clear All Overrides | Drops every object override on the layer so everything follows the layer style again. |
| Save as Preset... | Saves the layer's style to your global preset library. |
| Save as Project Preset... | Saves the preset inside this project, so it travels with the .asp. |
| Remember Style | Teaches the Layer Style Database how this layer name should look, for future imports. |
| Forget Remembered Style | Removes that memory. Shown only when the layer name is remembered. |
| Delete | Deletes the layer and everything on it, after confirming. |
Right-Click an Object
| Item | What it does |
|---|---|
| Isolate Layer | Isolates the object's layer, or the layers of every selected object when several are selected. Unisolate appears here too while layers are isolated. |
| Edit Path | Enters path-edit mode on a path you drew. |
| Merge Paths | With several open paths selected, joins them into one compound path. They must share endpoints and form a connected chain. |
| Merge Areas | With several areas selected, joins the ones that touch into one area per layer, keeping the style of the one selected first. Also on the canvas right-click menu. See Merging Areas. |
| Unmerge | Breaks a merged path back into its components. |
| Send to Front / Send to Back | Moves the object in draw order. |
| Material | Tags this object with a material. |
| Clear Overrides | Returns the object to its layer's style. |
| Save as Preset... / Save as Project Preset... | Saves this object's style as a reusable preset. |
| Duplicate | Copies the object in place. |
| Delete | Removes the object. |
Selecting in the Tree
Clicking a tree item selects it on the canvas and vice versa. Ctrl+Click adds
objects to the selection and Shift+Click selects a range. With several objects
selected, a style change applies to all of them (see
Editing Several Objects at Once).
Layers are styled one at a time; to make several layers match one you have finished, use
Paint Style.
On layer rows, Ctrl+Click and Shift+Click pick several layers at
once for Isolate.
Working by Layer
A large drawing can carry thousands of objects. When you are styling layers rather than single objects, turn off Show Objects above the tree and the tree lists layers only.
- Click an object on the canvas and its layer is selected: the tree scrolls to the layer, the properties show the layer's style, and the object is outlined so you can see what you clicked. Changes go to the whole layer.
Ctrl+Clickadds or drops another object's layer, and dragging a box picks the layers of everything inside it.- The outlined objects are not selected, so they cannot be moved, and
Deleteleaves them alone. The trash button above the tree still deletes the selected layer, after asking. - Drawing, pasting, editing a path and double-clicking text still select the object itself, and its layer's row is highlighted.
Turn Show Objects back on to style or move one object. The setting is saved with the drawing, and undo leaves it alone.
Isolating Layers
Isolating a few layers fades the rest of the drawing so you can work with just those. The faded layers stay in sight for reference, but a click on the canvas cannot select them and the Paint tool ignores their linework. Paint a drainage area from its boundary layer alone, and the lot lines, streets and labels inside it no longer break the area up.
- Select objects on the layers you want to keep, on the canvas or in the tree, or pick the
layer rows in the tree (
Ctrl+Clickfor several). - Click Isolate on the VIEW or DRAW tab, or right-click and choose Isolate Layer.
- Select the layer you want to paint onto. The layer selected in the tree always stays at full strength, and a layer you paint onto joins the isolated set.
- When you are done, click Unisolate in the status bar (or on the ribbon) to bring every layer back.
Objects selected on the faded layers drop out of the selection when you isolate. Isolation only changes the view. It is not saved with the project, undo leaves it alone, and exports always show every layer. Hidden layers stay hidden.
The Library Panel
Below the tree, the Library expander holds two things, chosen with the category list:
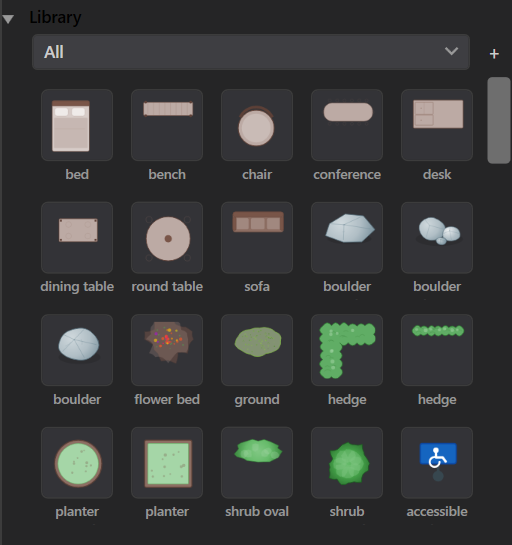
- Style Presets holds your saved styles. Select a layer or object first, then click a preset to apply it.
- Asset categories cover Trees, Landscaping, Site, Utilities, Parking, Furniture, People, Vehicles and Symbols. Drag a tile onto the canvas to place it.
The + button imports your own SVG or raster asset into the library. Tiles show one entry per symbol, drawn in the current look's family. Switch the document look and the library previews change with it. See Symbols & Images.
Stacking Another Project
FILE ▸ Stack File imports a second .asp into the open one
for a match line sheet, a detail block or an inset. The preview dialog offers an X and Y
offset, a document size with an Auto-fit button, and a choice of whether
imported layers merge into existing layers or come in with a
prefix on their names. Prefixing keeps the two drawings' layers separate so
they can be styled independently. The whole import is one undo step.
Both projects must use the same units. Stacking a millimeter project into an inch project is refused rather than silently rescaled.