Main Window
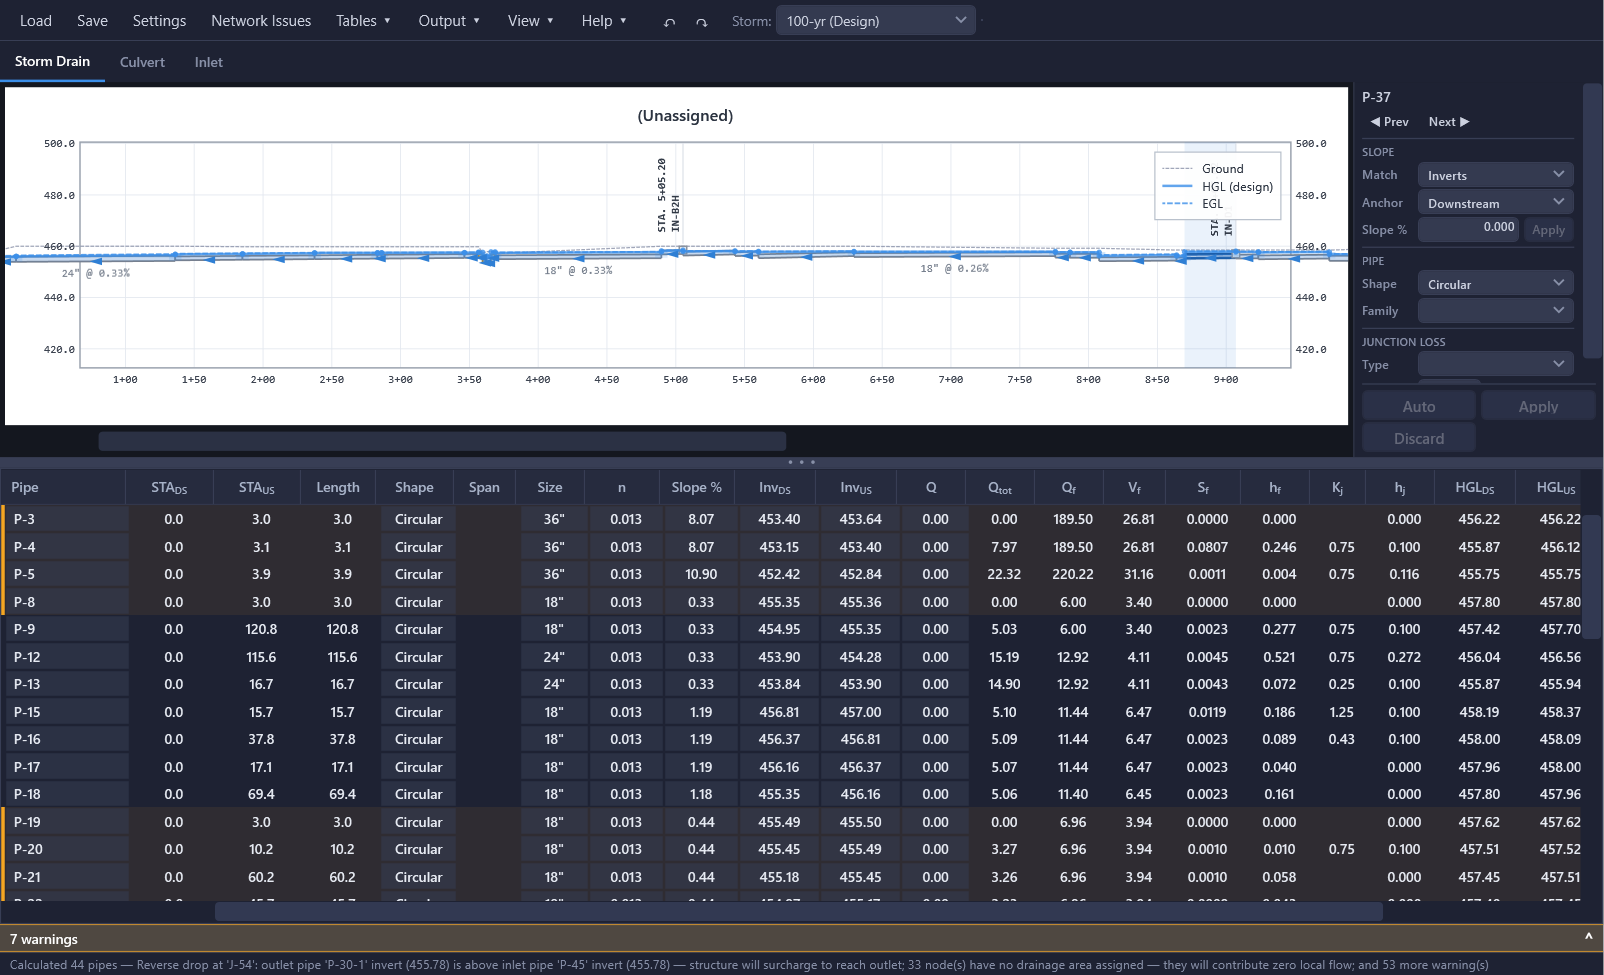
The main window floats alongside your drawing: it stays open and usable while you keep working in Civil 3D, so you never have to close it to pan, zoom, or edit the drawing. Below the toolbar, the window is organized into three tabs (Storm Drain, Culvert, and Inlet), each with its own profile canvas, results grid, and inline property panel. The Inlet tab is disabled until the inlet design module is enabled for the project (see Inlet Analysis).
Toolbar
The toolbar spans the top of the window and provides access to all major commands, organized into logical button groups from left to right.

Project Menu
A dropdown menu holding every project-file command, plus the link between this drawing and its project file:
- New Project...: Discards the current project and re-imports the network from the drawing.
- Open Project... (
Ctrl+O): Opens an existing.hspproject file. The file contains pipe geometry, hydrology data, loss library assignments, and all project settings. - Save (
Ctrl+S): Saves to the project's current file path without prompting. If the project has never been saved, it prompts for a location first. - Save As... (
Ctrl+Shift+S): Always prompts for a file path and saves the project there. - Link to Project File...: Points this drawing at a project file so HydraStorm opens it automatically next time the drawing is opened.
- Unlink from Drawing: Removes this drawing's pointer to its project file.
Settings
Opens the Project Settings dialog, where you configure hydrology mode, storm events, design constraints, Manning's n defaults, and output options. The active design standard (junction loss library) is selected separately from the Minor Losses dialog. On the HydraLink Fixed Flows (Peak Flows) basis, this button carries a small count badge when a linked basin reaches no structure through the flow mapping grid; see Basins That Reach No Structure.
Drawing Menu
A dropdown menu holding the tools that act on the drawing itself rather than on the design: one that reports what is wrong with it, one that fixes what can be fixed, and one that renumbers its parts. When issues are found the button itself reads ⚠ Drawing (n) in amber, so a closed menu never hides a count.
Network Issues...
Detects drawing and data problems and lists them in one dialog: connectivity issues (unconnected pipe ends touching in plan, stationing that doesn't match the pipe's length or runs against the rest of its run, both the signature of an alignment that doubles back past the pipe, or of a pipe on the wrong alignment; fixed in Civil 3D), mis-labeled and unassigned pipes (a pipe on the wrong reference alignment, or on none, with the alignment HydraStorm suggests and a High / Medium / Low confidence rating beside it. The Detail column states the offset and the reason. Re-assignable in one click, never applied on its own), and several data-integrity rows: a basin assigned to a structure that no longer exists, a HydraLink flow link that fed a structure that no longer exists, an inlet bypassing to a structure that no longer exists, an inlet assigned a type the active library no longer has, an inlet's gutter section that its assigned type can't stand in, an inlet on a null structure with no rim elevation entered (the inlet still rates, but its HGL surcharge check is skipped until a rim is typed on the Inlet tab; see Inlet Analysis), an on-grade inlet with no longitudinal slope entered (not rated: its gutter flow passes through uncaptured until the designer enters the grade; see Inlet Analysis), a curb-opening or combination inlet with no opening length entered (not rated until a length is entered; see Inlet Analysis), an adverse pipe stub pinned to keep its drawn direction, a flat pipe whose flow direction can't be told from the drawing (set it on the pipe; a flat pipe between directed pipes needs no row, and one drawn against its own parallel barrel is treated as reversed and says so), a pond drawn as a single pass-through structure (see HydraLink Integration), an alignment HydraStorm created that is no longer in the drawing (it can be recreated exactly; see Clean Up Drawing, below), and four rows from pipe-fitting classification: a null structure/fitting part with three or more inlets (not a wye), a size change at a bend or a wye's trunk, a wye whose lateral angle couldn't be resolved, and a pipe that shrinks going downstream, plus a HydraStorm-authored fitting description the network has moved out from under ("Fitting label outdated," with its own Update Fitting Labels… button that reopens Label Fittings pre-filtered to just those rows). See Label Fittings for the fitting rows. The two orphaned-link rows name Refresh from Civil 3D as the remedy when the structure was re-created rather than truly deleted. Each row names the pipe, structure, or basin involved; clicking a row highlights it in the results grid and profile view, and the full explanation appears below the list. The menu item shows a count and switches to an amber warning style when issues are found, and so does the Drawing button that holds it.
Clean Up Drawing...
The other half of the Drawing menu: it fixes drafting defects rather than reporting them, such as reversed pipes, zero-length pipes, missing reference alignments, alignments with no assigned run, structure rims, and the network's reference surface. Like every other automated fix in HydraStorm, it suggests each change and asks you to confirm before touching the drawing.
When HydraStorm itself created an alignment (from the missing-reference-alignment fix above), the project remembers it. If that alignment is later erased from the drawing, or the drawing was never saved, Clean Up Drawing offers to recreate it exactly as it was made, rather than a plain Create along today's pipe path; a run whose alignment HydraStorm didn't create still gets the plain Create offer. A recreated alignment is a new object as far as Civil 3D is concerned, so any profile views or HGL profiles drafted against the old one will show as outdated and need re-drafting. After creating alignments, saving the project also offers to save the drawing so the alignments aren't lost with an unsaved drawing: an offer, never a requirement, and declining stops the reminder.
Rename Parts by Run...
Numbers structures from each run's outfall upstream (A-1, A-2, …) and renames pipes to match, pushed to Civil 3D on Apply. It writes names into the drawing rather than editing a table, which is why it sits here rather than under Tables.
Label Fittings...
Writes manufactured-fitting-style Civil 3D part Descriptions (24" X 18" 45%%d WYE, 18" 90%%d BEND, 24" X 18" PIPE SIZE CHANGE) onto the wyes, bends, and pipe-size changes HydraStorm classifies in the network, from templates you control. Same suggest-and-confirm shape as Rename Parts by Run above: review and check the rows you want, click OK, then Apply to C3D. See Label Fittings for the full reference: templates and tokens, angle resolution, staleness tracking, and how a hand edit in Civil 3D is handled.
Refresh from CAD
The ↻ icon button just right of the Storm selector, kept out of the Drawing menu deliberately because it is a one-click action with a warning state of its own. Re-reads the active pipe network from Civil 3D and opens a Refresh from Civil 3D review dialog before anything in the model changes; nothing re-reads the drawing on its own. The button glows amber and reads Refresh from CAD ⚠ once a pipe or structure has been added, erased, or modified in the drawing since HydraStorm last read it: the badge is only a prompt, not an automatic refresh, and HydraStorm's own writes back to Civil 3D never light it. See Refresh from Civil 3D for what the review dialog shows and how to resolve each section.
Tables Menu
A dropdown menu providing access to the bulk data-entry tables and the alignment classification editor:
- Pipe...: Bulk-edit Manning's n across pipes.
- Hydrology...: Edit peak flows or rational-method basin parameters per node.
- Basin Assignment...: Drag HydraLink basins and junctions onto the structures of a run. HydraLink hydrology mode only. On the Basin Parameters basis, the Tables button carries a small count badge and this item itself turns amber with an inline count when a linked basin reaches no structure; see Basins That Reach No Structure.
- Minor Losses...: Assign loss types, Kj overrides, and structure/deflection parameters; choose the active design standard.
- Alignment Types...: Classify each alignment as Storm Drain, Culvert, or None. See Alignment Design Types.
- Culvert Roadways...: Set the roadway embankment over each culvert crossing (crest elevation, weir lengths, and surface) for HDS-5 overtopping analysis.
Output Menu
A dropdown menu for pushing results out of HydraStorm, grouped by where the output lands. Drafting items (profiles, views, and the CAD tables) highlight in amber when the drafted copy in the drawing no longer matches the current results:
Profiles & Labels
- Create HGL Profiles...: Opens an options dialog (storm to profile, profile style, and full vs. Simple HGL) and creates or replaces Civil 3D layout profiles for the calculated HGL on each alignment. Simple HGL places PVIs only at each pipe's upstream/downstream HGL and each structure's HGL, for plans that label profile PVI points. See Profiles & Labels.
- Create Profile Views...: Drafts Civil 3D profile views for the selected alignments, trunk lines with their laterals in rows, with surface profiles, pipes, and crossings. See Profile Views.
- Apply Label Styles: Applies the configured pipe and structure label styles to pipes and structures in profile views.
Tables to Drawing
- Storm Drain Tables...: Drafts one storm drain hydraulic table (HGL computations) per alignment run and per storm the Storm Drain storm grid runs: the design storm's table first, then a table for each other storm, titled with it (
LINE A - 25-YR Check) and with check-storm columns hidden. The design table is titled with the design and check storm years, using the same column layout as the Excel export. - Culvert Table...: Drafts one combined culvert schedule (HDS-5 headwater, tailwater, control type, and outlet velocity) for every culvert-designated alignment.
- Inlet Tables...: Drafts inlet capacity schedules, one table per inlet type, each with only the columns that apply to that type.
- Crossing Table...: Re-scans for pipe crossings and drafts one combined crossing schedule.
- Quantities Table...: Drafts a quantities takeoff table: pipe LF by size, material, and cut-depth class, plus structure counts.
Export
- Excel Workbook...: Opens the column-layout dialog, then writes the full Storm Calcs workbook. See Export.
- Drafted Outputs...: Lists every HGL profile, profile view, and CAD table HydraStorm has drafted into this drawing, flags which are stale against the current results, and re-drafts the stale ones in place with one click ("Update Outdated").
The geometry-only outputs, namely Create Profile Views, Crossing Table, and Quantities Table, draft straight from the drawing model and don't require a successful calculation. Everything else on this menu requires current results.
View Menu
The View button opens a dropdown covering profile overlays, zoom, and results grid layout:
- Show HGL: Show/hide the Hydraulic Grade Line overlay.
- Show EGL: Show/hide the Energy Grade Line overlay.
- Show Crossings: Show/hide crossing pipe indicators (Storm Drain tab only).
- Show Ground: Show/hide the ground surface profile.
- Rescan Crossings: Re-reads the drawing's other pipe networks, including data-shortcut'd water and sewer lines, and rebuilds this network's crossings. Crossings are captured automatically at network import and refreshed when a project is opened; run this manually after a shortcut is synchronized or a utility is moved, added, or deleted mid-session. Also refreshes the crossing keep-out rings Auto Design grades around.
- Basin Map in Drawing: Overlays HydraLink basin boundaries on the Civil 3D drawing, with each structure's basins in its own color, unassigned basins outlined in orange, solid lines where flow enters via the inlet and dashed where it's piped directly. Selecting a pipe narrows the map to its run. Screen-only, never plotted; available only when the project's hydrology mode is HydraLink.
- Fit to Extent (
Ctrl+F): Auto-zoom the profile canvas to fit all content, or, on a storm drain run longer than the configured long-run window limit, to the current windowed view. See Long Runs & the Profile Window. - Fit to Selection (
Ctrl+Shift+F): Zoom the profile to the selected pipe(s) plus half of each adjacent pipe. Double-clicking a pipe in the profile does the same in one action, selecting it and fitting the profile to it. See Profile View for details. - Design Columns Only: Hides the intermediate hydraulic detail columns in the results table, leaving the editable inputs plus the key results. Remembered per-user across sessions. See Results Table for the exact column list.
- View Settings...: Opens the profile display preferences dialog: canvas theme (Drafting Sheet or Dark), the long-run profile window limit, per-storm HGL/EGL/Ground color and line style, water-surface fill, and the legend overlay. See Profile View.
The Culvert tab has its own compact View ▾ button docked above its profile canvas, with Show HGL / Show EGL / Show Ground toggles scoped to that tab. The Inlet tab has no View menu; its header instead carries Storm Events... (jumps to the inlet storm and Storm Drain coupling settings), Columns... (choose which columns the inlet results grid, Excel sheet and drafted schedules carry), and, once any inlet fails a criterion, an "N failing" toggle chip that filters the structure list and results grid to rows needing attention.
Help Menu
- Online Help...: Opens the HydraStorm help site in your browser.
- Keyboard Shortcuts (
F1): Lists all keyboard shortcuts. - Guided Tour...: Replays the guided walkthrough of hydrology, fitting labels, minor losses, inlet design, crossings, Auto Design, and slope editing using a bundled sample project. Runs automatically the first time you open HydraStorm; replay it any time from this menu.
- Run Diagnostic (HSDIAG)...: Generates a diagnostic bundle of the active project and network for support. See Troubleshooting.
- Feedback..., Account..., About: Send feedback, manage your license, and view version information.
Undo / Redo
- Undo (↶ button,
Ctrl+Z): Reverts the last edit to the working session. - Redo (↷ button,
Ctrl+YorCtrl+Shift+Z): Re-applies the last undone edit.
Network and Storm Selectors
A Network dropdown selects which Civil 3D pipe network to work with. Next to it, a Storm dropdown selects which configured storm event's results are displayed in the results grid. Storms compute lazily: selecting a storm whose results predate the latest edit recalculates it on the spot. When one or more configured storms haven't been recalculated yet, a small amber note next to the selector names them; picking a listed storm, or running any export, brings it current.
Project-Link Banners
Above the toolbar, HydraStorm shows a banner instead of a dialog for conditions that don't block work but need attention: a mismatch between the drawing HydraStorm is editing and the one currently active in Civil 3D (writes are refused while this shows), a project file link that points at a file HydraStorm can't find (with Locate… and Unlink actions), and a linked HydraLink file that's no longer reachable (saved flows still apply; only live refresh is lost).
Actions
Pinned actions appear in the property panel on the right of the profile canvas rather than the top toolbar:
- Auto (Auto Design): Runs the pipe sizing engine to automatically select pipe sizes meeting design criteria, scoped to the alignment shown in the profile.
- Apply (Apply to C3D): Writes all pending edits (pipe inverts, sizes, materials) back to the Civil 3D drawing. Nothing in the drawing changes until you click Apply.
- Discard: Reverts the working session to the last-applied snapshot, discarding all unapplied edits.
The Calculate action has no dedicated toolbar button: press F5, or simply edit a property, since results refresh automatically a moment after you stop typing.
Profile Canvas
The large area to the left of the property panel on each tab is the profile view, a custom-drawn canvas that renders pipes, structures, HGL/EGL overlays, ground surface, and (Storm Drain tab only) crossing pipes in profile. Click a pipe to select it, use arrow keys to navigate, and watch the display update in real time as you edit properties. See the Profile View page for full details.
The profile pane is resizable: drag the visible grip between the profile canvas and the results grid to give either one more room. The height you set is saved per-user and shared between the Storm Drain and Culvert tabs, so you only have to adjust it once. Double-click the splitter to collapse the results grid entirely and give the profile the full tab height; double-click again to restore it.
Results Grid
The bottom portion of each tab contains a results grid showing hydraulic calculation output for every pipe segment (or, on the Inlet tab, every inlet): flow, velocity, HGL elevations, junction losses, and more. Rows are color-coded to flag warnings and errors. See the Results Table page for the Storm Drain grid's full column reference.
Property Panel
On the Storm Drain and Culvert tabs, the property panel is docked inline to the right of the profile canvas and shows fields for the currently selected pipe: navigation, slope settings, shape/part family, and junction loss assignment, plus the pinned Auto/Apply/Discard actions. On the Inlet tab, a separate right-side panel shows the selected inlet's type, gutter section, and bypass settings. See Property Panel for full details. Fields not exposed in the property panel (including pipe size, invert elevations, and Manning's n) are edited directly in the results grid.
Status Bar
The status bar at the very bottom of the window shows the current status message (e.g. save confirmations, calculation timing, or an edit-rejection reason). Directly above it, a collapsible calculation message strip appears whenever the last run produced warnings or errors: it shows a one-line severity summary (colored by the most severe message present) and expands, on click, into the full list of messages with icons for info/warning/error.
Two chips can dock at the right end of the status bar. ⇑ Update available: vX.Y.Z appears in amber when a newer HydraStorm is released; hover it for the release notes and click it to open the downloads page. When the release is flagged critical (a calculation fix, say), the chip reads ⚠ Critical update: vX.Y.Z in red with the reason in its tooltip, and a Critical Update dialog opens once per version. A red ⚠ Critical notice: click to view chip carries any other critical notice from Bezalel Design Lab the same way. Nothing blocks the app; the chips stay as the reminder until you update.
Keyboard Shortcuts
| Shortcut | Action |
|---|---|
Ctrl+O | Load Project |
Ctrl+S | Quick Save (current file path; keyboard only) |
Ctrl+Shift+S | Save (prompts for file path) |
Ctrl+Z | Undo |
Ctrl+Y / Ctrl+Shift+Z | Redo |
F5 | Calculate |
Ctrl+F | Fit profile to extents |
Ctrl+Shift+F | Fit profile to the selected pipe(s) |
| Double-click (profile pipe) | Select a pipe and fit the profile to it |
Left / Right Arrow | Select previous / next pipe in the network |
Ctrl+M | Match Slope across the selected pipes |
Ctrl+Shift+L | Set Slope on the selected pipe(s) |
Ctrl+Shift+R | Raise/Lower the selected pipe(s) |
F1 | Keyboard Shortcuts reference |